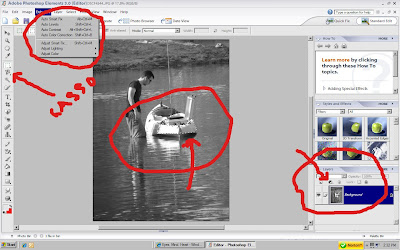
First of all you can do this with a color photo or a black and white photo. Note that even if it's a black and white photo you still have to remove the color. I was unable to edit a black and white photo without first removing the color. In PhotoShop open your photo. I then select ENHANCE - ADJUST COLOR - REMOVE COLOR. If it's a black and white photo you won't see a difference. If it's color photo turning black and white, once the photo is in B&W you might notice some blotchiness in some tones, you might not (just a warning).
Next. You want to make sure your LAYERS editing window is open. If it's not open click on WINDOWS on the toolbar and click on "Layers". A little toolbox will pop-up.
Next. In the editing toolbar on the left where your options are the selection tool, text, paintbucket, etc., pick the LASSO tool. There should be a tiny arrow in the lower right corner of that option. If you click on it you have three options of the kind of lasso to use. Choose the magnetic lasso. This means when you are tracing your object to color, it will automatically follow the line even if your mouse is not straight. The trick is that sometimes it may not follow the line you want it to follow. It may take some practice to learn when to allow it to follow the line and when you need to assist. I'll explain later.

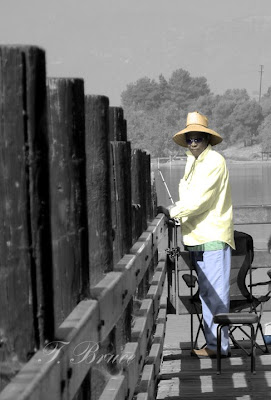
Once you've selected the magnetic lasso, click where you want to add color and trace the outline of the area. In the picture above I started with the shirt. If you mess up and the line goes haywire, double-click to end the action and it should complete a space with a flashing double-dashed line. Right click, Deselect and start over.
While you're tracing, if you click once it creates a marker point and you can continue. With some objects you make have to do this a lot so that it will not automatically follow another line. This is what I mean by manual. The more defining the line you trace, the more "magnetic" and automatic the trace is done for you.
When you have created a complete trace the flashing double-dash line will appear. Make sure to connect your starting spot with the ending spot to complete the trace and get the flashing line.
Now that you've selected your object, in the LAYERS toolbox you should see a tiny image of your photo and it should say "Background" to the right. Just above your imagine is a small circle that is half white and half black. Click on it. You'll get a drop-down menu. These are your choices with how to fill the space you selected to color. I used "Photo Filter" but you can experiment with any of those choices.
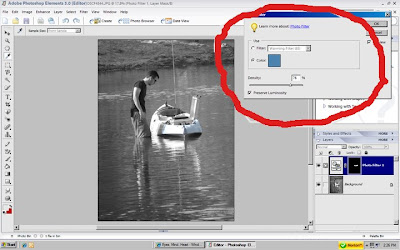
Another drop-down menu will appear. Click on the color box and select the color you would like to fill in your selected area (see photo below). Change the color density to your desired color. You should see the color change in your main photo. If the color is not what you want you can change the color until you get what you want, then click OK. If you find it's not what you want after you've done this you can always click UNDO until you get back to the selection on your photo (the flashing line) and go back to the LAYER options.

Repeat the selection and color process as often as you like. You will notice in the LAYERS toolbox that each time you add a color it adds another layer to the photo. If you want to edit the actual photo you have to scroll through the layers until you get to the actual small photo. Click on it and you can now edit the original photo (lighten, darken, crop, etc.), keeping the color changes you've made.
Again, this is for PhotoShop but if you have another photo editing program, take a moment to view the toolbar options. I'm sure it has the same basic editing options, just maybe in different places. All programs basically work the same, it's just a matter of finding out where they are in each program. There are also probably other ways to do it, this is just the way I know how to do it and I'm still learning all of the editing features in the program.

15 comments:
Very nice job.
Thanks for the tutorial. I don't have Photoshop Elements, but I'm going to see if I can do something similar with the program I do have. I like the yellow in your picture -- it adds a lot.
Nice photo, and a very nicely done tutorial.
A lot of work...and the way to do it if you want to do it right and/or if there are a mixture of colors throughout the photo. But if you happen to have only one thing in the shot of a certain color...say a red door...you might try desaturating the red channel on an adjustment layer while leaving the other channels in tact. Sometimes that works.
I'm sure it is not as hard as it appears to me right now. Thanks or sharing the info, you photos are turning out wonderful.
A big thank you - looks like I'm going to have to get me some more software. (picturesocial.com has been very helpful in helping me understand photography; http://digital-photography-school.com/ has also been helpful. You are apparently learning in leaps and bounds as well. Cudos to the both of us - and to all the other beginners we are running into along the way...)
Nice picture. I need to get me a Photoshop. I have one but it will not work on my Vista.
Excellent info TB. Thanks for sharing.
thank you for the interesting tutorial.
I don't have Photoshop Elements, but I do have a birthday coming up. I really like the effect. Thanks for the tutorial.
Wow, and you figured this out all by your ownlittleself? BRAVO! I'll have to experiment a bit!
Great explanation on how you accomplshed that effect.
Are you watching?
BIG SMILE!
Wow! Thanks for the instructions. I'm going to try them.
Paz
I don't use Photoshop, I use paintshop pro and another way i have done this technique is by opening up the colored photo and then duplicating it, make the duplicate black and white (lots of ways to do this with both programs)
so now the colored photo is the bottom layer and the black and white the top. so now using the selection tool (freehand set at point to point)(might want to set the feather at 3 or 4 but not necessary) start outlining the areas you want to give color. then hit the delete key on the keyboard and viola, color appears. I haven't done this in a few years so sure hope this was explained right.
Post a Comment